How to Set Up a Branded Link-in-Bio Page
The technical setup for a link-in-bio page takes a few minutes. Deciding what actually belongs on it takes longer, and is the part most walkthroughs skip in favor of button-clicking instructions. This covers both: the actual setup steps, and the content decisions that determine whether the finished page helps or just becomes a worse version of a website's nav menu crammed into one mobile screen.
What to Decide Before You Start
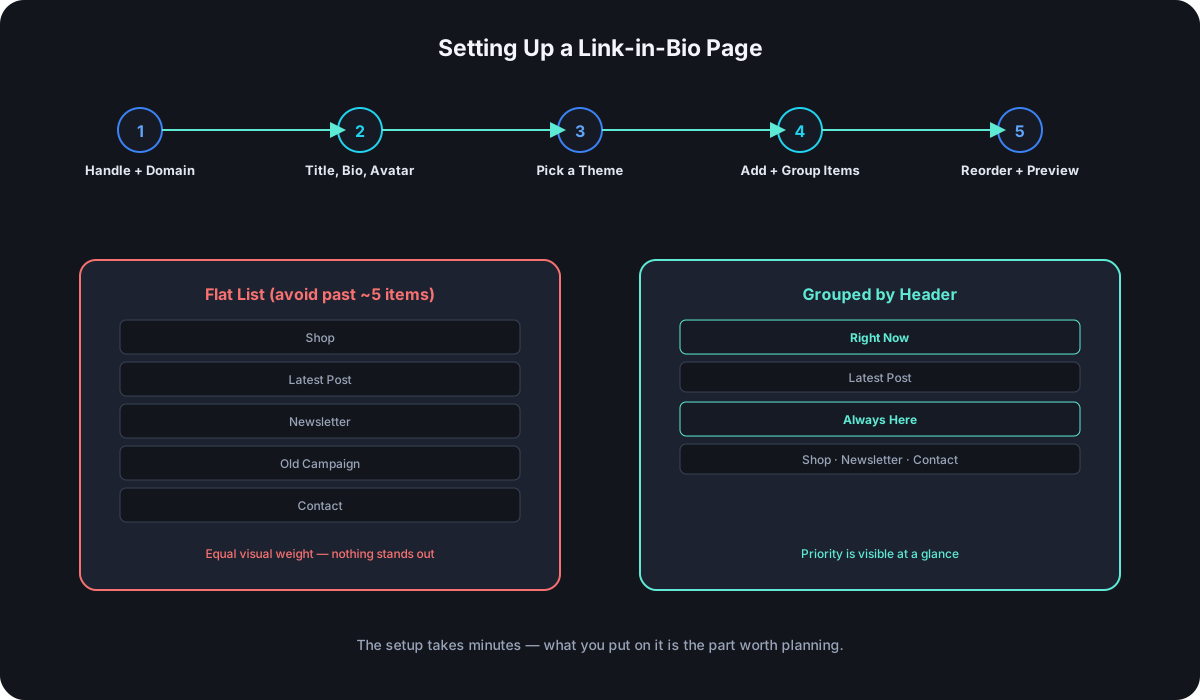
Two decisions upfront save a rebuild later: which domain the page lives on, and what actually goes on it. A custom domain should be sorted first if you're using one, since the page's URL is the thing your entire audience sees before anything else about it. For content, resist the urge to list everything you've ever published — pick the 3 to 6 destinations that actually matter right now, since a bio page that tries to be a full site directory helps nobody find anything.
The Setup, Step by Step
- Create the page and choose a handle. The handle becomes part of the URL (
yourdomain.com/@handle), so pick something that matches your actual social handles rather than something you'll want to change later. - Add a title, a short bio line, and an avatar. This is the only context a visitor gets before scrolling to the links themselves — a generic or missing avatar is a small but real signal that the page was thrown together rather than intentional.
- Pick a theme. Visual consistency with your brand matters more than which specific theme you pick — a mismatched theme is more noticeable than a plain one.
- Add your links as items, using headers to group related ones once you have more than four or five. A flat, undifferentiated list of ten buttons is harder to scan than the same ten links organized under two or three clear headings.
- Reorder by actual priority, not by when you added them — the item at the top gets seen and clicked disproportionately more than anything below the fold on a small screen, so it should be whatever matters most right now, not whatever you happened to add first.
- Preview before publishing. Check it on an actual phone screen, not just a desktop browser — bio pages exist specifically for the mobile context most of their traffic comes from, and layout issues that look fine on desktop sometimes don't translate.
Choosing What Actually Goes On It
The temptation is to treat a bio page like a sitemap — every product, every post, every social profile, all listed. Resist it. The entire value of the format is presenting a curated menu, not replicating your full site's navigation in a worse, more cramped format. A good default: one link for whatever's most time-sensitive right now (a launch, a current promotion), a handful of evergreen destinations (shop, contact, newsletter), and nothing else unless there's a specific reason for it.
Common Setup Mistakes
Using raw, unshortened URLs instead of tracked links. Every item on a bio page should be a tracked link if the platform supports it — otherwise you get a page-view count and nothing telling you which specific button actually gets chosen.
One flat list once the page grows past a handful of items. Structure — headers, grouping, visual separation — stops being optional the moment a page has more than about five items; without it, the most important link and the least important one carry identical visual weight.
Leaving the page in draft after finishing it. An easy, entirely avoidable mistake — the setup is complete, but the page never actually goes live because the final publish step got skipped.
Never revisiting it after the initial setup. A bio page tied to a specific launch or promotion that never gets updated afterward quietly becomes stale — a page still promoting last month's campaign weeks after it ended is a common, fixable failure of maintenance rather than setup.
What Changes Once It's Live
The mechanics are identical to any other link once it's published — what changes is where it sits. A bio page on your own domain reads as more legitimate than one on a shared, generic domain for the same trust reasons that apply to any branded link, and it's the one link your entire social audience sees repeatedly, which makes getting the content and structure right worth the extra few minutes beyond just clicking through the setup.
Frequently Asked Questions
How many links should a bio page actually have? Enough to cover what matters right now without requiring scrolling past more than a screen or two on mobile — typically 3 to 6 primary items, with headers if you're grouping beyond that.
Should I update my bio page every time I post something new? Only the time-sensitive top item needs frequent updates; evergreen destinations (shop, contact) can stay static indefinitely without needing attention.
Can I test changes before my audience sees them? Setting a page to draft while editing, then publishing once it's ready, keeps in-progress changes from being visible mid-edit — check whether your platform supports that workflow before making live edits directly.
Does the order of items actually matter for clicks? Yes — top-of-page position on a small screen gets disproportionate attention, which is exactly why reordering by current priority rather than by add-date matters more than it looks like it should.
Where Cut.bd Fits
Cut.bd's bio page setup follows the same flow described above: choose a handle, add your title/bio/avatar, pick from four built-in themes, then add Link, Header, and Divider items with drag-to-reorder — available on the default URL from Free, with your own domain supported from Starter. Each link item tracks its own click count alongside the page's view count, and the Draft toggle lets you finish edits privately before publishing, closing off the most common setup mistake on this list by design.
Found this useful? Share it.
Try Cut.bd's link shortener — free, no account required.
Shorten a link